Timeseries forecasting for weather prediction
Authors: Prabhanshu Attri, Yashika Sharma, Kristi Takach, Falak Shah
Date created: 2020/06/23
Last modified: 2020/07/20
Description: 이 예제는 LSTM 모델을 활용한 시계열 예측에 대해 다룹니다.
This notebook demonstrates how to do timeseries forecasting using a LSTM model.
- 케라스
- Colab
- Github
Setup
이 예제는 텐서플로우 2.3 또는 그 이상이 필요합니다.
This example requires TensorFlow 2.3 or higher.
import pandas as pd
import matplotlib.pyplot as plt
import tensorflow as tf
from tensorflow import keras
시계열 기후 데이터 (Climate Data Time-Series)
우리는 Max Planck Institute for Biogeochemistry에 의해 측정된 Jena Climate dataset을 사용할 것입니다. 이 데이터셋은 온도, 기압, 습도 등의 14가지 피쳐로 구성되어 있으며, 매 10분마다 측정되어 있습니다.
위치: 독일 Jena에 위치한 생물지구화학을 연구하는 Max Planck 연구소의 날씨 스테이션
시간 구성: Jan 10, 2009 - December 31, 2016
아래 표에 컬럼 이름과 값의 형식, 설명이 나와있습니다.
We will be using Jena Climate dataset recorded by the Max Planck Institute for Biogeochemistry. The dataset consists of 14 features such as temperature, pressure, humidity etc, recorded once per 10 minutes.
Location: Weather Station, Max Planck Institute for Biogeochemistry in Jena, Germany
Time-frame Considered: Jan 10, 2009 - December 31, 2016
The table below shows the column names, their value formats, and their description.
| Index | Features | Format | Description |
| 1 | Date Time | 01.01.2009 00:10:00 | Date-time reference |
| 2 | p (mbar) | 996.52 | 내부 압력을 정량화하는 데 사용되는 파스칼 SI 유도 압력 단위. 기상 보고서는 일반적으로 대기압을 밀리바 단위로 나타낸다. The pascal SI derived unit of pressure used to quantify internal pressure. Meteorological reports typically state atmospheric pressure in millibars. |
| 3 | T (degC) | -8.02 | Temperature in Celsius |
| 4 | Tpot (K) | 265.4 | Temperature in Kelvin |
| 5 | Tdew (degC) | -8.9 | 습도에 대한 온도(섭씨) 이슬점은 공기 중 물의 절대량을 측정하는 것입니다. DP는 공기가 그 안에 있는 모든 수분을 담을 수 없고 물이 응축되는 온도입니다. Temperature in Celsius relative to humidity. Dew Point is a measure of the absolute amount of water in the air, the DP is the temperature at which the air cannot hold all the moisture in it and water condenses. |
| 6 | rh (%) | 93.3 | 상대 습도는 공기가 수증기로 얼마나 포화 상태인지를 측정하는 측도이며, %RH는 수집 물체 내에 포함된 물의 양을 결정합니다. Relative Humidity is a measure of how saturated the air is with water vapor, the %RH determines the amount of water contained within collection objects. |
| 7 | VPmax (mbar) | 3.33 | 포화증기압 Saturation vapor pressure |
| 8 | VPact (mbar) | 3.11 | 증기압 Vapor pressure |
| 9 | VPdef (mbar) | 0.22 | Vapor pressure deficit |
| 10 | sh (g/kg) | 1.94 | Specific humidity |
| 11 | H2OC (mmol/mol) | 3.12 | Water vapor concentration |
| 12 | rho (g/m ** 3) | 1307.75 | Airtight |
| 13 | wv (m/s) | 1.03 | Wind speed |
| 14 | max. wv (m/s) | 1.75 | Maximum wind speed |
| 15 | wd (deg) | 152.3 | Wind direction in degrees |
from zipfile import ZipFile
import os

uri = "https://storage.googleapis.com/tensorflow/tf-keras-datasets/jena_climate_2009_2016.csv.zip"
zip_path = keras.utils.get_file(origin=uri, fname="jena_climate_2009_2016.csv.zip")
zip_file = ZipFile(zip_path)
zip_file.extractall()
csv_path = "jena_climate_2009_2016.csv"

df = pd.read_csv(csv_path)
df.head()
Raw Data Visualization
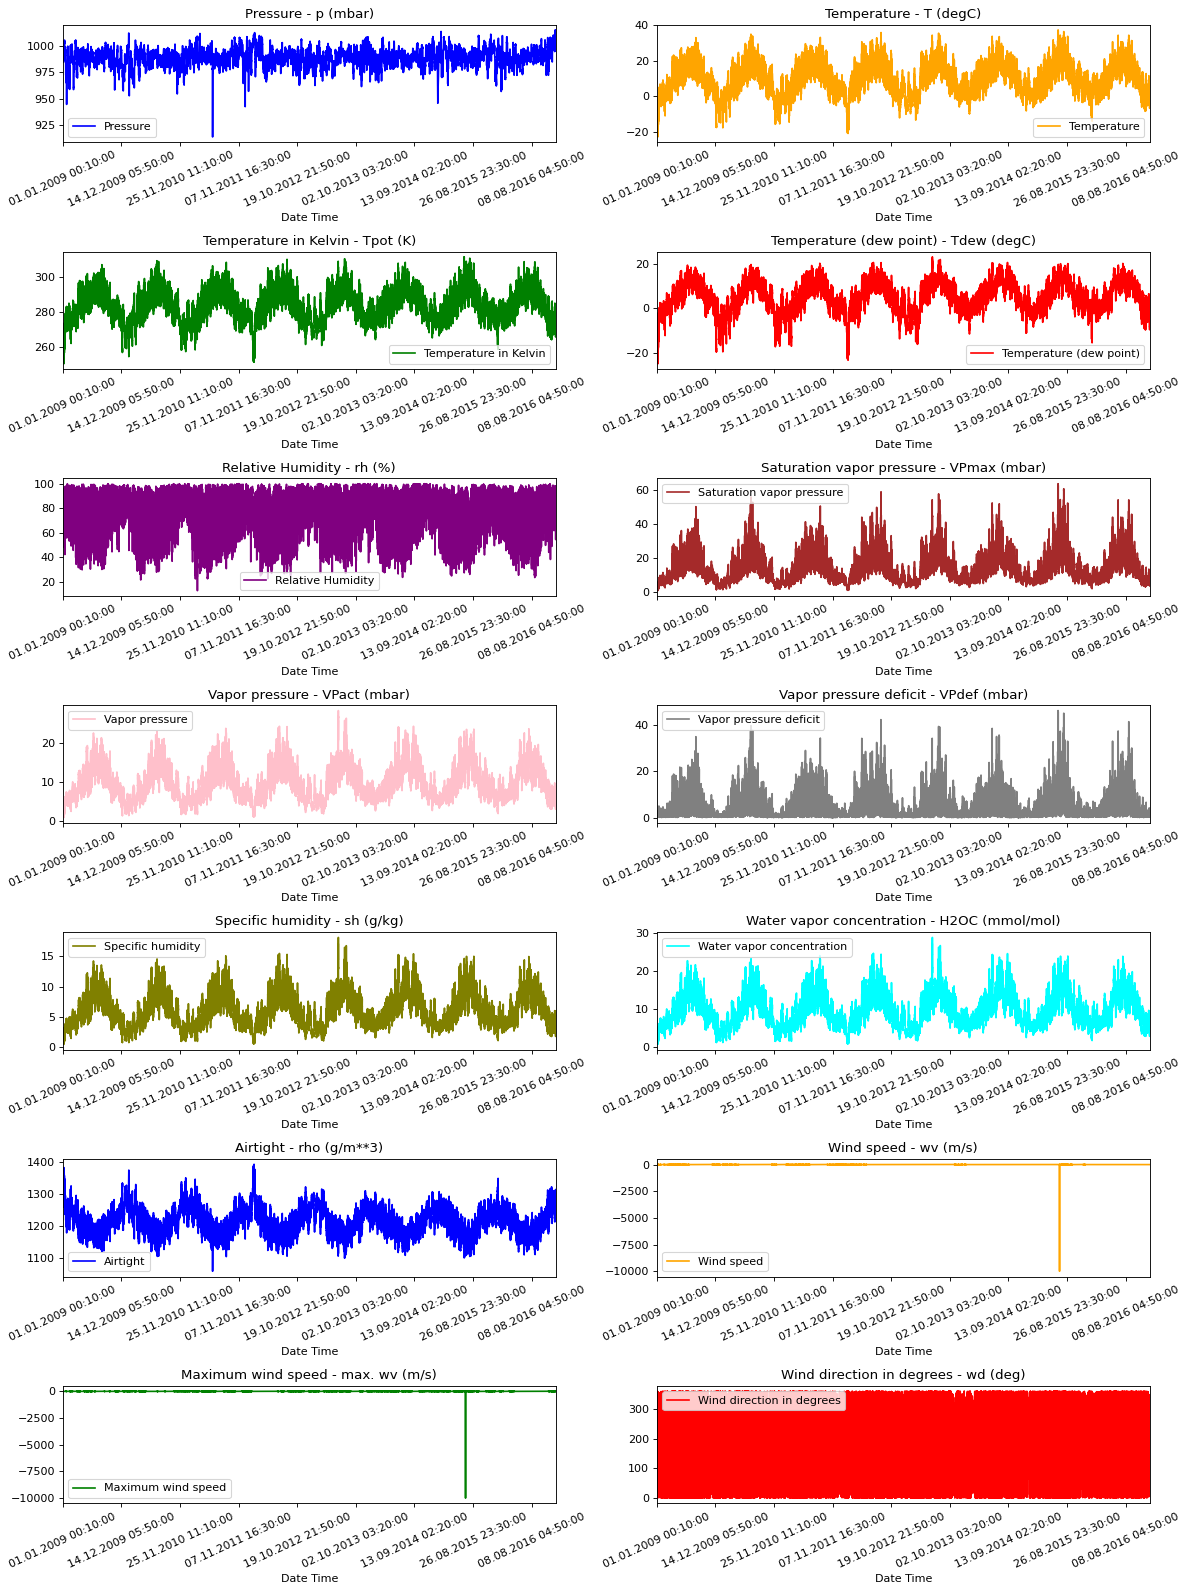
현재 작업 중인 데이터에 대한 정보를 제공하기 위해 아래에 각 피쳐에 대한 시각화가 있습니다. 2009년부터 2016년까지의 기간 동안 각 피쳐의 고유한 패턴을 보여줍니다. 또한 정규화를 통해 해결될 수 있는 이상(anomaly) 징후를 보여줍니다.
To give us a sense of the data we are working with, each feature has been plotted below. This shows the distinct pattern of each feature over the time period from 2009 to 2016. It also shows where anomalies are present, which will be addressed during normalization.
titles = [
    "Pressure",
    "Temperature",
    "Temperature in Kelvin",
    "Temperature (dew point)",
    "Relative Humidity",
    "Saturation vapor pressure",
    "Vapor pressure",
    "Vapor pressure deficit",
    "Specific humidity",
    "Water vapor concentration",
    "Airtight",
    "Wind speed",
    "Maximum wind speed",
    "Wind direction in degrees",
]

feature_keys = [
    "p (mbar)",
    "T (degC)",
    "Tpot (K)",
    "Tdew (degC)",
    "rh (%)",
    "VPmax (mbar)",
    "VPact (mbar)",
    "VPdef (mbar)",
    "sh (g/kg)",
    "H2OC (mmol/mol)",
    "rho (g/m**3)",
    "wv (m/s)",
    "max. wv (m/s)",
    "wd (deg)",
]

colors = [
    "blue",
    "orange",
    "green",
    "red",
    "purple",
    "brown",
    "pink",
    "gray",
    "olive",
    "cyan",
]

date_time_key = "Date Time"


def show_raw_visualization(data):
    time_data = data[date_time_key]
    fig, axes = plt.subplots(
        nrows=7, ncols=2, figsize=(15, 20), dpi=80, facecolor="w", edgecolor="k"
    )
    for i in range(len(feature_keys)):
        key = feature_keys[i]
        c = colors[i % (len(colors))]
        t_data = data[key]
        t_data.index = time_data
        t_data.head()
        ax = t_data.plot(
            ax=axes[i // 2, i % 2],
            color=c,
            title="{} - {}".format(titles[i], key),
            rot=25,
        )
        ax.legend([titles[i]])
    plt.tight_layout()


show_raw_visualization(df)
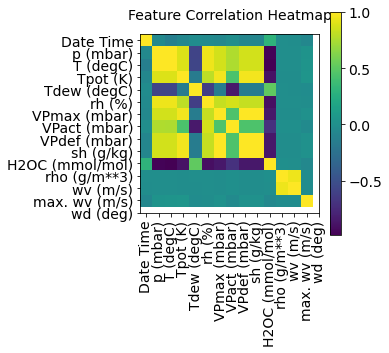
이 히트맵은 피쳐간의 상관관계를 보여줍니다.
This heat map shows the correlation between different features.
def show_heatmap(data):
    plt.matshow(data.corr())
    plt.xticks(range(data.shape[1]), data.columns, fontsize=14, rotation=90)
    plt.gca().xaxis.tick_bottom()
    plt.yticks(range(data.shape[1]), data.columns, fontsize=14)

    cb = plt.colorbar()
    cb.ax.tick_params(labelsize=14)
    plt.title("Feature Correlation Heatmap", fontsize=14)
    plt.show()


show_heatmap(df)

Data Preprocessing
우리는 training을 위해 약 300,000개의 데이터를 사용하겠습니다. 데이터들은 매 10분마다 기록되었고, 이는 1시간당 6번 기록되었다는 것을 의미합니다. 1시간 이내에 날씨의 급격한 변화는 없을 것으로 예상되므로 1시간당 1포인트로 다시 표본으로 추출하겠습니다. 이 작업은 keras.preprocessing.timeseries_dataset_from_array의 sampling_rate 옵션을 통해 수행됩니다.
Here we are picking ~300,000 data points for training. Observation is recorded every 10 mins, that means 6 times per hour. We will resample one point per hour since no drastic change is expected within 60 minutes. We do this via the sampling_rate argument in timeseries_dataset_from_array utility.
지난 720회(720/6=120시간 = 5일(120/24))의 타임스탬프 데이터를 추적하고 있습니다. 이 데이터는 타임스탬프 72개(72/6=12시간) 이후의 온도를 예측하는 데 사용됩니다.
다시 정리하면, 지난 5일간의 데이터를 바탕으로, 12시간 이후의 온도를 예측하는 모델을 만들 것입니다.
We are tracking data from past 720 timestamps (720/6=120 hours). This data will be used to predict the temperature after 72 timestamps (72/6=12 hours).
데이터의 모든 feature는 범위가 다르기 때문에, 신경망을 훈련시키기 전에 feature 값을 [0, 1]의 범위로 제한하기 위해 정규화를 수행하겠습니다. 각 피쳐의 평균을 뺀 다음, 표준 편차로 나눕니다.
Since every feature has values with varying ranges, we do normalization to confine feature values to a range of [0, 1] before training a neural network. We do this by subtracting the mean and dividing by the standard deviation of each feature.
데이터의 71.5%가 모델을 교육하는 데 사용됩니다(예: 300,693 행). split_fraction을 사용하여, 비율을 변경할 수 있습니다.
71.5 % of the data will be used to train the model, i.e. 300,693 rows. split_fraction can be changed to alter this percentage.
이 모형에는 5일 동안의 데이터(즉, 720개의 관측치)를 train에 사용합니다. 타임스탬프 72개(12시간) 이후의 온도는 레이블로 사용됩니다.
The model is shown data for first 5 days i.e. 720 observations, that are sampled every hour. The temperature after 72 (12 hours * 6 observation per hour) observation will be used as a label.
split_fraction = 0.715
train_split = int(split_fraction * int(df.shape[0]))
step = 6

past = 720
future = 72
learning_rate = 0.001
batch_size = 256
epochs = 10


def normalize(data, train_split):
    data_mean = data[:train_split].mean(axis=0)
    data_std = data[:train_split].std(axis=0)
    return (data - data_mean) / data_std
상관관계 heatmap을 봅시다. 상대 습도 및 특정 습도와 같이 일부 파라미터가 중복되어 있음을 알 수 있습니다. 따라서 모든 피쳐가 아닌 특정 피쳐를 사용할 것입니다. 아래에서 보듯이, Pressure, Temperature, Saturation vapor pressure, Vapor pressure deficit, Specific humidity, Airtight, Wind speed 피쳐만을 사용할 것입니다.
We can see from the correlation heatmap, few parameters like Relative Humidity and Specific Humidity are redundant. Hence we will be using select features, not all.
print(
    "The selected parameters are:",
    ", ".join([titles[i] for i in [0, 1, 5, 7, 8, 10, 11]]),
)
# The selected parameters are: Pressure, Temperature, Saturation vapor pressure,
# Vapor pressure deficit, Specific humidity, Airtight, Wind speed
selected_features = [feature_keys[i] for i in [0, 1, 5, 7, 8, 10, 11]]
features = df[selected_features]
features.index = df[date_time_key]
features.head()

features = normalize(features.values, train_split)
features = pd.DataFrame(features)
features.head()

train_data = features.loc[0 : train_split - 1]
val_data = features.loc[train_split:]
Training dataset
training dataset labels은 792번째 데이터부터 시작합니다. 앞서 설명했듯이 지난 720개의 데이터를 바탕으로 72 타임스탬프 이후의 데이터를 예측할 것이기 때문입니다.
The training dataset labels starts from the 792nd observation (720 + 72).
start = past + future
end = start + train_split

x_train = train_data[[i for i in range(7)]].values
y_train = features.iloc[start:end][[1]]

sequence_length = int(past / step)
timeseries_dataset_from_array 함수는 시계열 매개변수와 함께 동일한 간격으로 수집된 일련의 데이터 포인트(sequences/windows의 길이, 두 sequences/windows 사이의 간격 등과 같은)를 취합하여 main 시계열에서 샘플링된 시계열 input과 target의 배치를 생성한다.
The timeseries_dataset_from_array function takes in a sequence of data-points gathered at equal intervals, along with time series parameters such as length of the sequences/windows, spacing between two sequence/windows, etc., to produce batches of sub-timeseries inputs and targets sampled from the main timeseries.
dataset_train = keras.preprocessing.timeseries_dataset_from_array(
    x_train,
    y_train,
    sequence_length=sequence_length,
    sampling_rate=step,
    batch_size=batch_size,
)
Validation dataset
validation dataset에는 마지막 792개의 행에 대한 레이블 데이터가 없으므로 데이터 끝에서 792개를 빼야 합니다.
train_split 후 792부터 validation dataset이 시작되어야 하므로 label_start에 과거 + 미래(792)를 추가해야 합니다.
The validation dataset must not contain the last 792 rows as we won't have label data for those records, hence 792 must be subtracted from the end of the data.
The validation label dataset must start from 792 after train_split, hence we must add past + future (792) to label_start.
x_end = len(val_data) - past - future

label_start = train_split + past + future

x_val = val_data.iloc[:x_end][[i for i in range(7)]].values
y_val = features.iloc[label_start:][[1]]

dataset_val = keras.preprocessing.timeseries_dataset_from_array(
    x_val,
    y_val,
    sequence_length=sequence_length,
    sampling_rate=step,
    batch_size=batch_size,
)


for batch in dataset_train.take(1):
    inputs, targets = batch

print("Input shape:", inputs.numpy().shape)
print("Target shape:", targets.numpy().shape)

# Input shape: (256, 120, 7)
# Target shape: (256, 1)
Training
inputs = keras.layers.Input(shape=(inputs.shape[1], inputs.shape[2]))
lstm_out = keras.layers.LSTM(32)(inputs)
outputs = keras.layers.Dense(1)(lstm_out)

model = keras.Model(inputs=inputs, outputs=outputs)
model.compile(optimizer=keras.optimizers.Adam(learning_rate=learning_rate), loss="mse")
model.summary()

# Model: "functional_1"
# _________________________________________________________________
# Layer (type)                 Output Shape              Param #
# =================================================================
# input_1 (InputLayer)         [(None, 120, 7)]          0
# _________________________________________________________________
# lstm (LSTM)                  (None, 32)                5120
# _________________________________________________________________
# dense (Dense)                (None, 1)                 33
# =================================================================
# Total params: 5,153
# Trainable params: 5,153
# Non-trainable params: 0
# _________________________________________________________________
우리는 콜백함수로 ModelCheckpoint와 EarlyStopping를 사용할 것입니다.
ModelCheckpoint는 체크포인트를 저장할 때 쓰이고, EarlyStopping은 validation loss가 더이상 개선이 없을 때 훈련을 중단하는 용도로 쓰입니다.
We'll use the ModelCheckpoint callback to regularly save checkpoints, and the EarlyStopping callback to interrupt training when the validation loss is not longer improving.
path_checkpoint = "model_checkpoint.h5"
es_callback = keras.callbacks.EarlyStopping(monitor="val_loss", min_delta=0, patience=5)

modelckpt_callback = keras.callbacks.ModelCheckpoint(
    monitor="val_loss",
    filepath=path_checkpoint,
    verbose=1,
    save_weights_only=True,
    save_best_only=True,
)

history = model.fit(
    dataset_train,
    epochs=epochs,
    validation_data=dataset_val,
    callbacks=[es_callback, modelckpt_callback],
)


# Epoch 1/10
# 1172/1172 [==============================] - ETA: 0s - loss: 0.2059
# Epoch 00001: val_loss improved from inf to 0.16357, saving model to model_checkpoint.h5
# 1172/1172 [==============================] - 101s 86ms/step - loss: 0.2059 - val_loss: 0.1636
# Epoch 2/10
# 1172/1172 [==============================] - ETA: 0s - loss: 0.1271
# Epoch 00002: val_loss improved from 0.16357 to 0.13362, saving model to model_checkpoint.h5
# 1172/1172 [==============================] - 107s 92ms/step - loss: 0.1271 - val_loss: 0.1336
# Epoch 3/10
# 1172/1172 [==============================] - ETA: 0s - loss: 0.1089
# Epoch 00005: val_loss did not improve from 0.13362
# 1172/1172 [==============================] - 110s 94ms/step - loss: 0.1089 - val_loss: 0.1481
# Epoch 6/10
#  271/1172 [=====>........................] - ETA: 1:12 - loss: 0.1117
아래 함수를 활용하여 loss를 시각화할 수 있습니다. validation loss를 보면 1 에폭 이후, loss가 감소하지 않고, 오히려 증가하는 것을 볼 수 있습니다.
We can visualize the loss with the function below. After one point, the loss stops decreasing.
def visualize_loss(history, title):
    loss = history.history["loss"]
    val_loss = history.history["val_loss"]
    epochs = range(len(loss))
    plt.figure()
    plt.plot(epochs, loss, "b", label="Training loss")
    plt.plot(epochs, val_loss, "r", label="Validation loss")
    plt.title(title)
    plt.xlabel("Epochs")
    plt.ylabel("Loss")
    plt.legend()
    plt.show()


visualize_loss(history, "Training and Validation Loss")
예측 (Prediction)
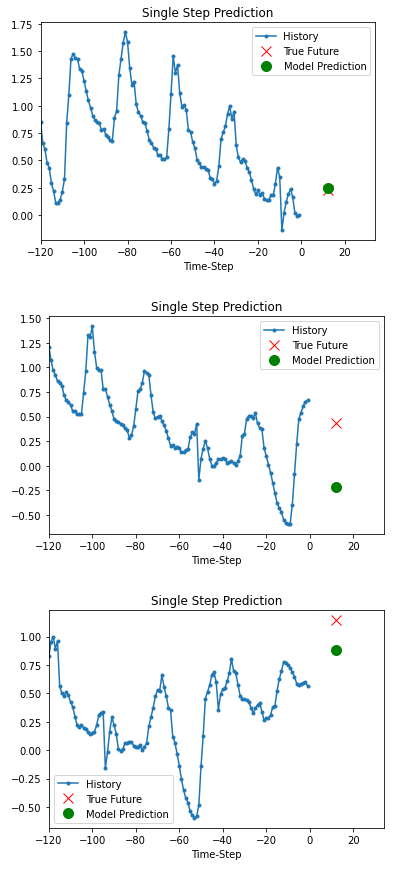
위의 학습된 모델을 바탕으로 validation set 중 3개의 데이터를 대상으로 예측을 해봅시다.
The trained model above is now able to make predictions for 3 sets of values from validation set.
def show_plot(plot_data, delta, title):
    labels = ["History", "True Future", "Model Prediction"]
    marker = [".-", "rx", "go"]
    time_steps = list(range(-(plot_data[0].shape[0]), 0))
    if delta:
        future = delta
    else:
        future = 0

    plt.title(title)
    for i, val in enumerate(plot_data):
        if i:
            plt.plot(future, plot_data[i], marker[i], markersize=10, label=labels[i])
        else:
            plt.plot(time_steps, plot_data[i].flatten(), marker[i], label=labels[i])
    plt.legend()
    plt.xlim([time_steps[0], (future + 5) * 2])
    plt.xlabel("Time-Step")
    plt.show()
    return


for x, y in dataset_val.take(3):
    show_plot(
        [x[0][:, 1].numpy(), y[0].numpy(), model.predict(x)[0]],
        12,
        "Single Step Prediction",
    )

'Tensorflow' 카테고리의 다른 글
| 협업 필터링을 활용한 영화 추천 (0) | 2020.12.19 |
|---|---|
| IMDB에 Bidirectional LSTM 모델 적용하기 (0) | 2020.12.17 |
| Tensorflow 콜백함수: ReduceLROnPlateau (2) | 2020.11.18 |
| Tensorflow 콜백함수: EarlyStopping (1) | 2020.11.18 |
| tensorflow 콜백함수: ModelCheckpoint (0) | 2020.11.17 |